Holiday Roasted Vegetable Salad

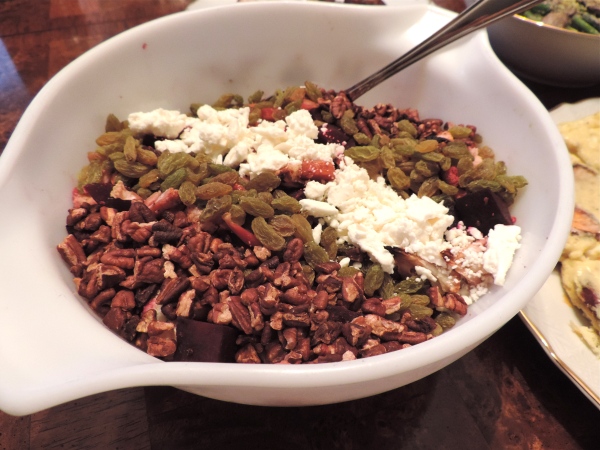
This roasted vegetable salad features beets, carrots and cauliflower tossed in a maple balsamic dressing with a toasty, nuttiness from pecans and a little sweetness from golden raisins. 

roasted_vegetable_salad

Happy Holidays, all! We’ve had an unseasonable winter thus far in Chicago. Last weekend it was 60 degrees, which I don’t think has ever happened in my lifetime.

Yes, I enjoy the warmer weather (this could be -40 degrees like the last couple years), but it’s a little disconcerting. It worries me about global warming, but more importantly, it makes it hard to get in the holiday spirit.

(I kid, I kid. Global warming is definitely > holiday spirit.)

But let’s focus on a problem I can immediately improve — holiday cheer! I’ve been doing everything I possibly can to make it feel like Christmas: decorating everything, Christmas-y smelling candles, Home Alone, Elf, Christmas tunes bumping…

What I really love about the holidays, though — and I think most people would agree — is getting to spend time with good friends and family and enjoying delicious food. So that’s what I’ve been trying to amp up.

holiday_table

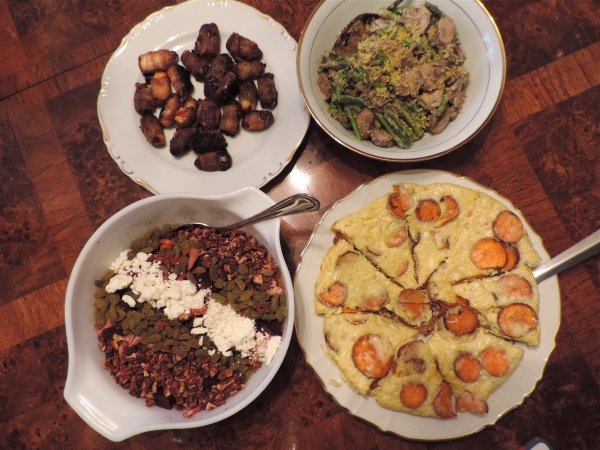
Last weekend I hosted some of my college girlfriends for a potluck + secret Santa exchange, a tradition we’ve had since we graduated. As the host, I decided to make a few items for the potluck:

Roasted Vegetable Salad (lettuce-free)

Lemon Tahini Vegetables

Sweet Potato Frittata

I’ll be posting the recipes throughout this week. I promise, they’re all very easy and can be done in part ahead of time. Hope you enjoy!

Roasted Vegetable Salad

Change out the standard lettuce-based salad for this one featuring roasted vegetables, toasted pecans and golden raisins. This would pair well with chicken or turkey, or would be fantastic over a bed of kale if you still want some greens in your salad.

Serves 10-12

Ingredients:

  • 4 large beets
  • 1 head cauliflower
  • roughly 10 carrots
  • 1 Tbsp. olive oil + 1 1/2 Tbsp. olive oil
  • 1/2 tsp salt
  • 2 Tbsp. balsamic vinegar
  • 1 Tbsp. maple syrup
  • 1 cup feta cheese (goat cheese would also be amazing)
  • 1 cup raw pecan pieces
  • 1 cup golden raisins

Directions:

Preheat oven to 425 degrees.

Wash all the vegetables well and lay on towels/paper towels to dry. Cut the ends off of the beets, peel them, and chop into 1/2″ cubes. Cut cauliflower in quarters and then cut Continue reading

Chocolate Coconut Sweet Potato Muffins {Paleo, Gluten-Free}

Sorry for the lull in posting, everyone. We recently moved and, as I’m sure you can all appreciate, it sucked up a lot of my time. Now that we’re more settled, you can look forward to many delicious recipes and informative blog posts to come. And the coming recipes will have a theme…

SWEET POTATOES!

After getting 10 pounds (no joke) of sweet potatoes from my CSA, I have been dreaming up many different sweet potato recipes — both savory and sweet.

As an inaugural recipe, I thought some sweet potato muffins would do the trick (and set the bar high for a series of delicious sweet potato dishes).

These sweet potato muffins are amped-up with coconut and chocolate chips. In case you didn’t know, chocolate chips make any baked good better. This is especially true when you’re trying to lighten up a recipe. A little pinch of chocolate chips goes a long way, my friends.

coconut_chocolate_sweet_potato_muffins

These muffins are inspired by this month’s Recipe ReDux theme:

Creative Quick Breads: The holiday baking season is upon us. And this month we’re going way beyond grandma’s banana bread. From sweet to savory and whole-grain to gluten-free, show us your new quick bread creation fresh from the oven.

For those that are paleo, gluten-free, grain-free or trying to cut down on sugar, these muffins are for you. They are made mostly from a variety of coconut products (oil, flour and shredded coconut), plus sweet potatoes, eggs, maple syrup and seasoning. Literally — that’s it. Oh, and chocolate obviously.

So with the colder/snowy weather (at least in Chicago) here, it’s time to get your baking on!

chocolate_sweet_potato_muffins

Chocolate Coconut Sweet Potato Muffins

These muffins are perfect as a better-for-you-dessert, or for a breakfast treat, pair one of these with a protein shake. They are grain-free, gluten-free, dairy-free, paleo and contain very little sugar. Enjoy!

Yields 12 muffins.

Ingredients:

  • 1 large sweet potato, cooked (baked or microwaved) and peeled
  • 3/4 cup coconut flour
  • 3/4 cup virgin coconut oil
  • 1/2 cup unsweetened shredded coconut
  • 1/4 cup + 2 Tbsp. maple syrup
  • 5 eggs
  • 2 tsp. pumpkin pie spice
  • 1 tsp. cinnamon
  • 1 tsp. vanilla extract
  • 1 tsp baking soda
  • 1 tsp. sea salt
  • 1 cup dark chocolate chips

Directions:

  1. Preheat oven to 350 degrees.
  2. Mash cooked and peeled sweet potato in a large bowl.
  3. Add all remaining ingredients EXCEPT for chocolate chips and mix well.
  4. Add paper liners to muffin tin (or grease). Then, add 1/3 cup scoop to each muffin tin. Top each muffin with 1 Tbsp. chocolate chips. Then press chocolate chips into tops of muffins.
  5. Bake for 25-50 minutes, or until tops of muffins bounce back.

paleo_sweet_potato_muffins

Quick breads make a great gift — who doesn’t love a delicious, “Baked With Love” present? To see more delicious quick breads, whether you want them all to yourself or you’re willing to share with loved ones, check out the link below.

Red Velvet Protein Bites {Recipe ReDux}

Red Velvet doesn’t have to mean cake and artificial food dye. Beets lend the most beautiful reddish-purple to these protein bites, along with an earthy taste. Keep these bites in the freezer for a healthy, nutrient-packed-but-treat-worthy snack!

red_velvet_protein_bites

I know you’re probably already celebrating, but tomorrow is National Nut Day!! On this joyous occasion what else would you want to do besides eat some nut-tastic foods? Well, the ladies of Recipe ReDux are equally as nerdy excited about nuts so they tasked us with sharing a nut-filled recipe for this month’s post.

And who doesn’t also love a delicious protein/energy bite? They are a great way to disguise nutrition as a dessert. Us dietitians love to pull that shit. Healthy dessert? Me? Nahhh.

beet_hands

Well, if there’s one thing I don’t want in my dessert or any of my food, it’s artificial food coloring. I don’t understand why we need it. I mean nature is full of amazing colors and flavors and I quite prefer the natural-ness.

Which is why I’ve never been a big fan of red velvet cake. While true red velvet cake utilizes beets for the red color, most bakeries take the shortcut and use red coloring. And sadly, I can guarantee you that many Americans would choose an artificially-colored red velvet cake over a beet-colored cake. [Sighhh]

This recipe relies on the nutritious and humble beet to provide both a sweet and earthy flavor as well as a gorgeous color. I mean, just look at the number the beets did on my hands ^^.

red_velvet_energy_bites

Red Velvet Protein Bites

Keep these frozen as they maintain their texture best that way. These only have 2 tablespoons of sweetener for the entire recipe but pack lots of protein and healthy fats from the almonds (almond meal and almond butter).

Ingredients:

  • 1 cup vanilla protein powder, such as Gold Standard Natural
  • 1/2 cup almond meal
  • 1/2 cup oats
  • 2 small beets
  • 2 Tbsp. honey, preferably local
  • 2 Tbsp. cocoa powder
  • 2 Tbsp. almond butter
  • 2 Tbsp. coconut milk
  • 1/2 tsp. sea salt
  • 1/2 cup dark chocolate chips

Directions:

  1. Preheat oven to 375 degrees. Wash beets well and chop ends off. Then, dice beets and spread on a baking sheet. Bake until soft.
  2. Add beets to a food processor and process until smooth. Then add all remaining ingredients EXCEPT for dark chocolate chips and process until well-mixed.
  3. Line a tupperware container with plastic wrap, then pour beet mixture into the container.
  4. Heat chocolate chips in the microwave for 1-2 minutes, stirring every 30 seconds until melted.
  5. Using a fork or spoon, drizzle chocolate over beet mixture. Stick the container in the freezer for 30 minutes, then cut into 1″ squares and store in freezer.

For more deliciously nutty recipes, check out these Cookie Dough Protein Bites, Roasted Brussels Sprouts with Hazelnuts or one of my all-time favorite nut butter recipes, Toasted Coconut Cashew Butter.

Oh, and did I mention all the amazing nut-filled recipes from fellow ReDuxers? Click the link below for those (and look for even more tomorrow)! 

Fall Flavors Series: Vegan Caramel Apples + Butternut Squash Curry

This fall, it’s my goal to go to the apple orchard (and to make the boy come with). Who doesn’t love to be surrounded by gorgeous fall foliage, delicious, freshly-picked apples and maybe an apple donut dipped into apple cider?

What’s even better, though, is when you get to take your freshly-picked, local apples and turn them into CARAMEL APPLES. And just in case you avoid dairy, are cutting down on sugar and/or avoiding corn syrup (often found in the caramel of caramel apples), are a vegan or just want a ridiculously easy, delicious, better-for-you caramel recipe — this caramel is perfect.

For a recent dinner party, I used Blissful Basil’s Five Minute Vegan Caramel as a part of a caramel apple “bar.” Imagine a sundae bar with all of the delicious toppings but instead of putting them on ice cream, you dipped your caramel apples in them.

Exciting, right?!

caramel_apples_with_toppings

Vegan Caramel Apples with Toppings

This is a fun, hands-on and healthified dessert that makes a great option for parties. Kids would love this as well — just change out the toppings with whatever you have on hand/enjoy best. Thanks to Blissful Basil’s amazing recipe for making this happen.

Ingredients:

  • 6 tart and crisp apples, such as Granny Smith, cut into wedges
  • Juice of one orange
  • 1/2 cup unsalted almond butter
  • 1/2 cup [real] maple syrup
  • 1/3 cup virgin coconut oil
  • 1 tsp. sea salt
  • 1 tsp. cinnamon
  • Toppings: unsweetened coconut flakes, candied ginger, candied pecans, and sea salt

Directions:

  1. Add apple wedges and orange juice to a zip-top bag and store in the fridge until ready to use.
  2. Heat almond butter, maple syrup, coconut oil, salt and cinnamon in a small saucepan. Bring to a boil, then turn heat down to low-medium and simmer for 5 minutes. Remove from heat and let cool (ideally in the fridge) for 20-30 minutes. Note, you can enjoy the caramel hot but it will thicken up the colder it gets.
  3. “Skewer” apple wedges using wooden skewers, popsicle sticks, or in our case — chopsticks!
  4. Lay out toppings in small bowls with spoons.
  5. Once caramel thickens, let your guests dip their apple wedges in and then choose their toppings.

I’d say these are some happy apple sundae-goers…

vegan_caramelvegan_caramel_apples caramel_apples

BUT WAIT! It’s not all about the dessert here. There’s also an amazing, easy entree: vegan butternut squash and lentil curry over coconut-lime cauliflower rice. Unfortunately, the curry didn’t photograph so well in the nighttime lighting so there’s no beautiful picture to show you. But just because there’s no photo, doesn’t mean it’s not insane-good.

Also, why have I not made curry in the crockpot before? It’s so easy and the longer you let it chill in the crockpot, the more the flavors meld together and the whole thing turns into this amazing, warming curry.

Butternut Squash and Lentil Curry over Coconut-Lime Cauliflower Rice

The cauliflower “rice” helps lighten this dish up a bit, making it lower carb AND higher in fiber and nutrients.

Curry Ingredients:

  • 2 butternut squashes, peeled, seeded and cubed (1/2″ cubes)
  • 1 red onion, diced
  • 2 red bell peppers, seeded and diced
  • 2 cans coconut milk
  • 2 cups orange lentils (any color/type would work well here)
  • 1 Tbsp. yellow curry paste
  • 2 tsp. sea salt
  • 2 tsp. garlic powder
  • 1 tsp. cumin
  • 1 tsp. cinnamon
  • 1 tsp. turmeric

Curry Directions:

  1. Throw all ingredients in the crockpot and turn to high. Cook for 4 hours, or until butternut squash and lentils are soft.

Cauliflower Rice Ingredients:

  • 2 heads cauliflower
  • 1/2 red onion, diced
  • Zest and juice of 2 limes
  • 1/2 cup shredded unsweetened coconut
  • 2 Tbsp. virgin coconut oil
  • 1 tsp. sea salt

Cauliflower Rice Directions:

  1. Wash cauliflower, remove leaves, and cut in half. Remove cauliflower “core.” Chop cauliflower into chunks and add about 2 cups worth at a time to a food processor. Pulse for 1-2 second intervals until cauliflower is a rice consistency. You can also grate the cauliflower on a box grater or just chop it up really well for the same effect, sans food processor.
  2. Heat a large skillet over medium. Add coconut oil and onions and saute onions for 2-3 minutes. Add cauliflower and saute for about 15 minutes. Add in lime zest and juice, shredded coconut and sea salt. Cook an additional 2-3 minutes.

Serve the curry over the cauliflower rice. And an expert tip here — make EXTRA and freeze the leftovers in individual containers for later enjoyment. I actually think it almost tastes better when re-heated.

Natural Hangover Remedies

So the wine was flowing a little too much last night, or your friends decided that Fireball shots at 1 AM were a good idea (NEVER a good idea). Now you’ve woken up with a splitting headache, stomach/GI discomfort, “out of it” feeling, extreme thirst or any combination of these symptoms. Hopefully this isn’t a regular occurrence, but if you do find yourself in this predicament, what to do?

martini

Besides getting hooked up to a banana bag, stat, here are some tips for getting over your hangover.

BEFORE DRINKING

  1. Eat Fat. While I want everyone to include fat in their meals/snacks, it is especially important to eat fats before drinking. Fatty foods delay the absorption of alcohol. That doesn’t mean you should eat a big ‘ol fried meal. Go for healthier fats like olive oil, coconut oil, butter, avocado, nuts/nut butters or a combination of these foods.
  2. Take Your Vitamins (and Minerals). Many vitamins, such as vitamin C and the B vitamins — along with other nutrients such as potassium, magnesium and sodium — can help prevent dehydration, control hangover symptoms and help you detox faster after drinking too much. You can either pop a vitamin or include a variety of foods at your pre-drinking meal. Try having some meat, a variety of vegetables cooked in healthy fats (see above), sprinkled with sea salt, with perhaps some nut butter as “dessert.”

WHILE YOU DRINK

  1. Water. You’ve heard it before, but drinking water while you drink alcohol (ideally alternating water with an alcoholic drink) helps fend off dehydration. Better yet, add a little salt to that water as the salt will help you retain more water — a good thing in the case of drinking.
  2. Choose High-Quality, Clear Alcohol. Gin and vodka contain fewer congeners, which are toxic chemicals produced during the making of alcohol. Colored alcohol such as whiskey, cognac and tequila contain more congeners, and thus make for a more wicked hangover.
  3. Stick to One Type of Alcohol. Mixing different alcohol is not only bad for your tummy/digestive system; it also makes it harder to keep track of how many drinks you’re having.
  4. Drink Less (DUH). This is definitely easier said than done. Try leaving the bar/party on the earlier side — maybe have a code with your significant other or friend. Or, ask for the bartender to give you a larger glass and fill it with more club soda (not more booze). It will take you more time to drink this larger volume, i.e. you will drink less overall.

THE MORNING AFTER

  1. Sleep in. While sleep won’t cure your hangover, it will help improve immunity, since a night of drinking takes a toll on the immune system.
  2. No Hair of the Dog. Having more alcohol the morning after drinking will only prolong your hangover. Try water with lemon — which can help detox your liver — and coffee instead.
  3. Eat a Healthy Breakfast. As much as you want crappy, greasy foods, they won’t help in the long run and will surely make that GI discomfort worse. Instead, try eggs, which contain cysteine that helps clear the liver of chemicals. Add some vegetables (read: antioxidants, vitamins and minerals) and healthy fats, like avocado, into the mix and you will feel better in no time.
  4. Get Moving. Are you going to run a marathon? No. But at least aim for a nice long walk. Fresh air and gentle movement is great for your hangover.

Cheers to a “healthy” night out, friends! If you have any other hangover remedies, please do share!

Fall Flavors Series: Roasted Brussels Sprouts with Toasted Hazelnuts

Brussels sprouts get an upgrade with toasted hazelnuts and orange juice and zest. This side dish is perfect for the holidays or a random weeknight.

Happy Friday! This has definitely been one of those weeks that feels like it’s never going to end and then, all of the sudden, Friday sneak-attacks and all is good. Isn’t that the best feeling?

A couple of weeks ago, I got to cook dinner for a group of ten awesome women as part of a fantastic event, Your Mat, Our Table. The event brought together women interested in healthy food and fitness by combining a one-hour rooftop yoga class overlooking Chicago and then a multi-course vegan, gluten-free meal made by moi, featuring dishes like my Kale, Roasted Butternut Squash and Pomegranate Salad and this yummy Brussels sprouts dish.

The menu utilized almost 100% local foods procured from the Evanston Farmers Market, mostly from Green Acres Indiana and Geneva Lakes Produce.

I was like a kid in a candy store that day at the market — was awesome getting to see, smell, touch and ultimately taste all that great produce whilst chatting with the farmers and other market patrons.

Did I mention the farmers market is my happy place? #nerdalert

brussels_sprouts

Roasted Brussels Sprouts with Toasted Hazelnuts and Orange Zest

These Brussels are gluten-free, vegan and most importantly, delicious. Either buy a bag of them or, if you’re a glutton for punishment like me, get a stalk or two and saw those puppies right off (try not to cut yourself).

Ingredients:

  • 2 lbs. Brussels sprouts, washed with outer few leaves removed
  • Zest and juice of one orange
  • 2 cups hazelnuts
  • 1 Tbsp. olive oil
  • 1/2 tsp. sea salt

Directions:

  1. Preheat oven to 425.
  2. Cut ends off of sprouts and then quarter them. Toss with olive oil and orange juice, then spread on a baking sheet and sprinkle with salt. Roast for 25-30 minutes, or until slightly charred.
  3. Meanwhile, chop hazelnuts and lay on baking sheet. Toast in the oven for 5-10 minutes, until the hazelnuts become fragrant.
  4. Sprinkle roasted Brussels sprouts with orange zest and toasted hazelnuts and serve.

Stay tuned for more recipes from the event, including vegan caramel apples. This Sunday, I’ll be posting the recipe for {crock pot} Butternut Squash and Lentil Curry with Coconut-Lime Cauliflower Rice. Get pumped!

Fall Flavors Series: Kale and Roasted Butternut Squash Salad

Happy Fall, y’all! With fall comes brisker weather — which as someone who is always warm, I quite enjoy — along with delicious foods. Pumpkin, anyone? See also: Brussels sprouts, squash in all shapes and sizes, cauliflower, sweet potatoes, etc.

I recently prepared a multi-course vegan meal for a group of wonderful women. A couple of friends came up with the idea for an event, GATHER: Your Mat, Our Table. The event included an hour-long rooftop yoga class and then a delicious vegan meal prepared by yours truly using almost completely local ingredients. Here’s the menu lineup (and credit to the farms that supplied the goods, AKA the veggies):

Lacinato kale,  cinnamon-roasted butternut squash and pomegranate salad with candied pecans and a fig-balsamic dressing

Roasted Brussels sprouts with orange zest and toasted hazelnuts

Purple and sweet potato fritters with spiced apple sauce

Butternut squash and lentil curry over coconut-lime cauliflower “rice”

Caramel apple bar

*Lacinato kale, purple and sweet potatoes from Green Acres Indiana Farm; Butternut squash, red onions, red peppers, cauliflower and Brussels sprouts from Geneva Lakes Produce; Apples from K & K Farms*

This was my farmer’s market haul for the event:

fall_vegetabls_in_season

Many of the awesome ladies at the event were asking for recipes, so I figured I would do a series of posts. I want to first highlight my personal favorite dish of the night (and one of the easiest to make!): a roasted butternut squash and kale salad.

I’m all about color and texture in my recipes, and this one really offers it all. Crispy kale, the “pop” of pomegranate, the smooth, creamy texture of roasted butternut squash plus candied pecans on the side to add sweetness and crunch.

Drizzle it with a super-simple Mission fig balsamic vinaigrette and you’ve got a major crowd favorite.

fall_salad

Fall Kale, Butternut Squash and Pomegranate Salad

This salad is vegan but to add a little more protein, try topping with grilled chicken, salmon or to keep it vegan/vegetarian and up the protein, add some lentils or chick peas to the mix.

Ingredients:

  • 1 medium butternut squash
  • 1/2 red onion, diced
  • 2 Tbsp. coconut oil
  • 1 tsp. cinnamon
  • 1 tsp. sea salt
  • 2 bunches lacinato (AKA dinosaur) kale, preferably organic, washed and torn into bite-sized pieces
  • 2 Tbsp. olive oil plus 3 Tbsp. olive oil, preferably cold-pressed
  • 1 large pomegranate
  • 8 oz. pecan halves
  • 1 Tbsp. maple syrup
  • 2 tsp. coconut oil
  • 1/2 tsp cinnamon
  • 2 Tbsp. fig balsamic (you can find at specialty grocery stores or olive oil/vinegar shops) Substitute balsamic vinegar if you can’t find fig balsamic 
  • 1 tsp. maple syrup

Directions:

  1. Preheat oven to 425 degrees.
  2. Cut the ends off of the butternut squash then cut in quarters. Scoop out the seeds. Using a sharp knife, cut the peel off, then dice into 1/2″ cubes.
  3. Toss diced butternut squash and red onion with coconut oil, cinnamon and sea salt. Spread on a baking sheet and roast for 25-30 minutes, or until desired level of char (I like mine really charred).
  4. While squash and onions are roasting, add kale to a large bowl and drizzle with 2 Tbsp. olive oil. Using hands, massage oil into the kale. This will take out some of the bitterness and make the kale a better texture. Put the massaged kale in the fridge to marinate while you prep everything else.
  5. To remove the seeds from the pomegranate, roll the pomegranate gently around on the table (before cutting into it). You will hear and feel the seeds loosening. Then, cut the pomegranate in quarters and scoop out the seeds. Keep seeds refrigerated.
  6. Add 2 tsp. coconut oil to a pan and heat for 1 minute, then add pecans, 1 Tbsp. maple syrup and 1/2 tsp cinnamon to pan and toast, stirring frequently, for about 5-7 minutes.
  7. Using a whisk, mix vinegar, 3 Tbsp. olive oil and 1 tsp. maple syrup.
  8. On top of “massaged” kale, add pomegranate seeds, roasted butternut squash/onions and candied pecans. Drizzle with dressing.

Stay tuned for more fall recipes coming your way. And while I’m not generally a “vegan” cook, these recipes have mass appeal and include REAL foods that anyone can get behind. Hope you enjoy!

Spiced Beef Stew {Recipe ReDux}

When the weather cools down, there’s nothing I love more than stew. Okay, maybe I love pumpkin more, but I digress.

Not only is stew fool-proof, but it allows for creativity. Have carrots? Peppers? Onions? Eggplant? Great! Now throw in some meat and seasoning and you’re good. You can change up the protein or vegetables or spices and create a completely new and delicious stew.

The true beauty of stew, though, is the leftovers! Make a big batch and freeze the leftovers in individual containers for a quick meal when you get home late from work or just don’t feel like cooking.

The whole make-extra-and-freeze-for-later principle was the theme for this month’s Recipe ReDux:

Fantastic Freezer Meals:

Share your tips and tricks for making one – or more freezer meals. It’s the end of the gardening season for some of us; let’s store away that produce in heat-and-eat-from-the-freezer-meals. Show how convenient healthy freezer breakfast, lunches or dinners can be!

My freezer meal is the aforementioned stew, but with a spiced Moroccan twist.

The key ingredient here is grass-fed beef, which provides a rich, slightly gamey taste that I absolutely adore. Look for 100% grass-fed beef because it, along with all 100% grass-fed meats, contains conjugated linoleic acid (CLA), which is the plant form of omega-3 fatty acids. In other words, grass-fed meat has a healthier fat source, not to mention it means the animal had a happier, freer life.

lamb chili

Spiced Beef Stew

Top this stew with a little quinoa or some sauteed potatoes and you’ve got a hearty, filling meal. Make a big batch of the quinoa/potatoes and you’ve got another side ready to go for later eating. 

Ingredients:

  • 1 Tbsp. coconut oil (virgin)
  • 1.5 lb. grass-fed beef cubes (such as sirloin)
  • 1 onion, diced
  • 10 carrots, sliced
  • 1 small eggplant, cubed
  • 2 cans diced tomatoes, preferably no salt added
  • 2 tsp. curry powder
  • 2 tsp. cumin
  • 1 tsp. chili powder
  • 1 tsp. turmeric
  • 1 tsp. sea salt
  • 1 tsp. black pepper
  • 1 tsp. cardamom

Directions:

  1. Heat coconut oil in a large pot. Add onions and saute for 2-3 minutes, then add beef. Saute beef for 5 minutes, making sure to sear all sides of the beef cubes.
  2. Add remaining ingredients, and bring to a boil, then simmer for 25-30 minutes, or until carrots and eggplant are tender.

For more amazing freezer meals, check out the link below! 

Olive and Red Wine Hummus {Sponsored Recipe ReDux}

I am currently blogging from #BlogBrulee at beautiful Smuggler’s Notch Vermont. I’m only half a day in and already I feel like I’ve learned so much and met the most amazing, inspiring bloggers. More on that to come – or if you can’t wait, check out my last post, which explains all about the awesomeness that is Blog Brulee.

I owe my ability to even go to Blog Brûlée to Recipe ReDux, which not only gives me creative recipe ideas every month and allows me to connect with fellow Recipe ReDuxers; it also means I get introduced to awesome foods/food brands/commodity boards like California Ripe Olives. They’ve challenged us ReDuxers to utilize and highlight California Ripe Olives in a unique and tasty recipe that also includes other flavors represented in the Mediterranean Diet e.g. vegetables, legumes, nuts, fish/seafood and more.

olive_hummus_with_wine

I received free samples of California Ripe Olives mentioned in this post. By posting this recipe I am entering a recipe contest sponsored by California Ripe Olives and am eligible to win prizes associated with the contest. I was not compensated for my time.

 If you haven’t gathered from my blog/social media food posts (which make up about 99% of my posts), I am a HUGE fan of Mediterranean foods, and being half Armenian, grew up eating the best.

My favorite Mediterranean food – hell, my favorite food period – is hummus. Hummus has the perfect blend of lemony-garlicky-olivey flavor that works just as well as a dip, spread, condiment or to eat with a spoon (guilty). Beyond the deliciousness, hummus provides great nutrition. My clients often think that hummus is “fattening.” Grrrrrr, the “fattening” comment AKA one of my dietitian pet peeves.

[Stepping on soapbox] First off, foods that contain fats, specifically the good ones – monounsaturated, omega-3s, etc. – do not make you fat. In fact, those fats bring down inflammation in your body, which can make you feel better and also decrease your risk for various health issues such as diabetes, heart disease and inflammatory issues like rheumatoid arthritis and IBS.

Second, let’s compare hummus to other condiments such as BBQ sauce, ketchup, premade salad dressings and all the other junk. Hummus generally contains whole, real ingredients, barely any sugar and not much sodium. It is an infinitely better condiment than the other aforementioned sauces, which are generally LOADED with salt, sugar/high-fructose corn syrup, weird oils, preservatives and more. [Stepping off soapbox]

Okay, back to my love affair with hummus and also my love for olives, which I’m not sure I’ve mentioned yet but which is real and true.

Olives are an essential part of the Mediterranean diet and contain monounsaturated fat (1.5 grams per 4-olive serving) – the good fat, as we’ve discussed. California Black Ripe Olives are as nutrient-loaded as they are tasty. They contain vitamin E (0.25 mg per serving), iron, (0.49 mg per serving), vitamin A (60 IU per serving) and fiber (0.5 grams per serving). California Ripe Olives are extremely versatile in the pantry.
Since I love hummus already, I figured why not pump up the olive flavor with California Ripe Olives? Oh, did I mention there’s also red wine thrown in the mix? Because sometimes when you’re making California Ripe Olive Hummus and drinking red wine, you have crazy ideas like adding said wine to the hummus. And sometimes these ideas actually turn out great, as they did here. Cheers to that!

California Ripe Black Olive and Red Wine Hummus

Serve this savory, briney hummus with your favorite vegetables, cheeses and meats or enjoy it spread on a sandwich or “dilute it” with some oil and vinegar like I do to turn it into a salad dressing.

mediterranean_hummus 

Ingredients:

  • 2 (15 oz.) cans garbanzo beans, drained and well-rinsed
  • 1 can California Ripe Black Olives, drained, with 2-3 olive reserved
  • 1/3 cup tahini (sesame paste)
  • 1/3 cup olive oil plus 1 tsp.
  • 1/3 cup red wine
  • Juice of 1 lemon
  • ½ tsp cumin
  • ½ tsp black pepper
  • 1 tsp. sea salt

Directions:

  1. Add all ingredients, except for olive oil, to food processor and process until smooth.
  2. Drizzle olive oil through the feed tube and process until well-incorporated.
  3. Chop reserved olives and add to the top of the hummus as a garnish. Drizzle with 1 tsp. olive oil.

For more California Ripe Olive recipes, check out the link below.

Improving My Blog Through Blog Brûlée

It’s hard to commit to a behavior change when you feel that you have too much on your plate. I hear this from clients all the time…”work is stressful right now so I don’t have the energy to cook” or “I don’t have time to exercise because I have too many other things to get done.” There are many more excuses, and I will admit that plenty of them have come from my own mouth.

Recently, I came to the realization that in order to make positive changes, you MUST feel that there is a reason for doing it, i.e. eating better to manage diabetes or to lose weight or exercising to become stronger. For example, I never find it difficult to eat healthy because I feel a million times better when I eat well versus when I eat crap. And I can see my body changing and my strength improving with exercise, so of course I want to keep it up.

As much as I love blogging, it is something that I have to devote major time and energy towards without necessarily seeing a major benefit (as in, more readers or revenue). Consequently, I don’t post often, which means my readership doesn’t improve, which means I continue to not make money off of my blog. Kind of a vicious cycle, no?

Enter Blog Brûlée, also known as the kick in the pants, savior, inspirer and booster-upper that I’ve been seeking (okay, I haven’t gone yet, but I’m pretty confident that I’ll be saying these things — and then some — after the event). 

blog brulee

My attendance at the Blog Brûlée is/was partially funded by Sponsors of the Blog Brûlée (hyperlink to blogbrulee.com), and I received a discounted registration to the event in exchange for writing this post. Opinions expressed are my own. I was not compensated for my time.

Blog Brûlée is an invitation-only, exciting, experiential weekend shared among a small, intimate number of healthy food bloggers and Registered Dietitian bloggers. The event is designed to provide education and professional development opportunities, as well as a forum for discussion and relationship building surrounding topics such as blogging and social media best practices, fundamentals of food photography, communication and marketing strategies, community niche development, brand identity and monetization.

I am sure that Blog Brûlée will provide many useful takeaways, but I am most excited to:

  • GET INSPIRED by like-minded bloggers, who are at all stages of their blogging journeys. There are truly some fantastic attendees going this year, who have already inspired me through their gorgeous photos, clever writing and delicious recipes. I CANNOT WAIT to meet these amazing ladies in person.
  • LEARN how to monetize my blog, take more captivating photos and communicate my food and nutrition knowledge to readers in a more engaging way.

But none of this would be possible without the masterminds behind Blog Brûlée. They are four amazingly talented women who continue to inspire me as a dietitian and [novice] food blogger: Regan Jones, RD (Healthy Aperture, The Recipe ReDux and RDs4Disclosure) Gretchen Brown, RD (kumquat), Deanna Segrave-Daly, RD (Teaspoon Communications) and Robin Plotkin, RD (Robinsbite).

There are also some fantastic sponsors, for whom I’m very thankful and with whom I’m incredibly excited to interact. In fact, I don’t think I could have chosen better sponsors myself. I am a huge supporter of them all and feel completely confident promoting their brands. They all represent REAL FOOD, which is my number one nutrition motto (#JERF).

So much excitement and it’s still nine days away!! Check out the awesome sponsors for yourself:

siggis

WWW.SIGGISDAIRY.COM
TWITTER.COM/SIGGISDAIRY
TWITTER.COM/SIGGIHILMARSSON
INSTAGRAM.COM/SIGGISDAIRY
FACEBOOK.COM/SIGGISDAIRY
PINTEREST.COM/SIGGISDAIRY
#DAILYSIGGIS

smuggs

WWW.FACEBOOK.COM/SMUGGLERSNOTCH
WWW.TWITTER.COM/SMUGGLERS_NOTCH
WWW.INSTAGRAM.COM/SMUGGLERSNOTCHVT#
WWW.YOUTUBE.COM/USER/SMUGGSTV

SafestChoice_Logo

ALM_GoldenAlm4cURL_R2

TWITTER.COM/ALMONDS
WWW.FACEBOOK.COM/CALIFORNIAALMONDS
WWW.PINTEREST.COM/ALMONDS/
INSTAGRAM.COM/CALIFORNIAALMONDS/
WWW.ALMONDS.COM/BLOG

Olive.Logo.small

WWW.CALOLIVE.ORG
WWW.FACEBOOK.COM/CALIFORNIARIPEOLIVES
WWW.TWITTER.COM/CALRIPEOLIVES  (@CALRIPEOLIVES)
WWW.PINTEREST.COM/CALRIPEOLIVES/